All of my shopping is finally finished and now it’s time to start wrapping gifts (my favorite part)! To make wrapping easier, I created a holiday gift wrap station in my house kind of like what the stores have in the mall.
In my holiday gift wrap station, I corralled all of holiday wrapping supplies such as wrapping paper, gift bags, tissue paper, cello bags, ribbon, bows, bells, etc into one area to avoid running all over the house to find supplies when needed. Total time it took to setup was 20-30 minutes! Happy holidays!
Video Details
Hi everyone. So Christmas is a few weeks away and yesterday I finished the majority of my Christmas shopping and I came back and was putting everything away or was taking everything out, looking at it like crossing things off my list and stuff, and then I was thinking, “OK. So when am I going to wrap all the gifts?” I love wrapping gifts. So I was thinking, “Should I wrap them now or should I wait and do it this weekend, whatever?”
So I started to actually wrap some gifts and then I figured, “Well, all my wrapping stuff is kind of like scattered in different places like I bought some, there are some upstairs in my office, my craft closet, and all that stuff. So then I was like, “Well, why don’t I just grab all my wrapping stuff and bring it down to like the kitchen, the common area and kind of set up like a holiday gift wrap station?”
So that’s exactly what I did and it only took me – it took like 20 minutes and it probably would have taken less time but then I started to get all excited and organized the station. So I’m going to show you exactly what it looks like. Just come over here. So it’s a temporary gift wrapping station like this is obviously is not going to be here year-round. So I kind of had to move furniture around like this is the big kitchen area.
How to Organize a Gift Wrap Station
How to Setup & Organize a Gift Wrapping Station
So here is exactly what I did. I’m going to give you guys a little tour of the gift wrapping area here. All right. So I got this 6-foot table from the garage. It’s from Costco which it stays folded inside the garage, brought it out, and I brought out all of my gifts like all the stuff that I bought that I’m going to wrap and give as gifts.
Now, I realized you probably can’t do that if you have kids and you don’t want them to see the holiday gifts obviously. So you may not be able to do that or you could set up your station inside of like the guest room and keep the door shut or the basement and keep the door shut, somewhere where like the whole family is not going to see all your gifts.
So what I did is I just put them – oh wait. Hold on. I forgot one thing. OK. So when I come to this station to start wrapping gifts, to get inside the holiday spirit, I have my little Santa’s elf hat that I got form Home Depot like two years ago so my plan is to come to the station, put my Santa’s elf hat on and pretend I’m an elf and wrap gifts. OK. So that sounds so cheesy but that’s what I’m going to do.
All right. So I come here. I put my Santa hat on. And then down here, I have all of the gifts that I bought and I’m going to start to wrap. So everything is just kind of hidden down here. You can kind of see. And everything is just like in a bag. Nothing is categorized or organized. I’m going to do that when I start to wrap gifts.
Organizing Wrapping Paper
All right. So gifts are down there. Wrapping papers, so when I started to organize the station, I realized that all the rolls of wrapping paper because they’re so awkward to store, they didn’t really like fit nicely on the table and I don’t want just stand them up in the back, so what I did was I put them down here. I kind of just rested them on top of the folding part underneath table and I was kind of excited about that because I was like, “Oh, now they’re out of the way and they’re easy to access and they’re all right there. I can just grab a sheet when I want.
So I put out there the gift wrapping paper. These two over here, these were taller so they didn’t really fit nicely right there so those are just leaning. And then all of my gift bags, I brought all the gift bags down and I use an S hook. S hooks are these little hooks. They actually look like an S that’s why they’re called S hooks. And I just hooked it to this little holding part at the handle and I put all my bags there. And I was so excited about that. I called Ed over and he was excited too. Actually, he wasn’t excited. I was the only one that was excited.
All right. So on top of the table, I have all of – like over here, I have all of the bows and ribbons inside here. So this is everything that goes on top of a gift. Like I’m probably not going to use this, it’s crushed. And actually, it came crushed. I was kind of mad two years ago like all the bows just came like smashed and stuff. So obviously, I’m not going to use that one. But this is all the stuff that goes on top of a gift like ribbon, there are bells in here, there are little bows so you can tie on it.
And then if you kind of look closer here, so I kind of just went around, when I was organizing the table, I just went around the house and I have random organizing products in the basement of our house that’s like kind of store down there. I’ll take you down there one day. But I just got random organizing products and I brought them up, just stuff that was not being used like these little double shelves that go in the bathroom cabinet or in the kitchen cabinet, brought those up and I put like all fabric that I’m going to use to decorate all of these jars.
So I have all these jars here. So what I’m planning to do is make fun mint, hot chocolate jars. Like you see the jars that have like the pretty layers like that with different colors, so I’m going to do that and I’m going to put the fabric on top here and then put a ribbon around and then tie the little like ingredients instructions on how to actually make the hot cocoa. So that’s the plan for these jars.
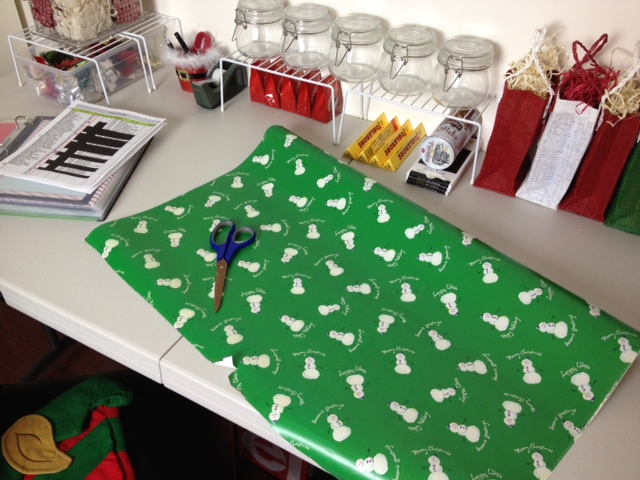
And then over here, I have my tape, my scissors. This is one of those like a pen, this is one of those gadgets that you just go like that in a wrapping paper and then it just cuts perfectly. And then I have this cute little Santa’s belt, little cup holder that I got from Pier 1 last year.
So basically, everything here is everything I’m going to need to wrap gifts. So this, this is my holiday binder that I showed you guys, on Monday, I posted the video. This is like my holiday checklist of everybody that’s getting gift cards, stocking stuffer, and thank you card. And then I showed you guys the binder on Monday. It’s like my gift tags, my address labels my holiday cards, my thank you cards, and like holiday stickers and paper. And I think that was it. All right. So that just stays right here with the checklist on top so I can just continuously go through the checklist and just check things off.
And then in the middle part down here, so whenever I’m wrapping gifts, I always like to attach like extra little things that people can get excited about when they open the gift. So that might mean like attaching a candy bar or like little Lance chocolates just like this or like a thing of cookie. So I just – so I bought all of those things and I just place them underneath and then I’ll just grab them whenever it’s time to place them on top of a gift.
OK. And then over here, I have all these little holiday bags that I got to fill them with like little goodies and candy and stuff. They’re so cute. They’re from World Market and they came in three different colors. So those are the bags. And then grass to put inside the bags, and then to put inside of bigger bags, and then to put inside of like little treat bags when you put like cookies inside and stuff, so grass right there. And then candy canes.
So depending upon when I post this video, so today I’m filming this on Tuesday. I’m hoping to post this on Wednesday. But on Thursday, I have a – it’s kind of like a craft tutorial on how to make this jumbo size candy cane. So one of my friends and I, we spent all of Sunday – actually, Saturday, we spent all of Saturday like 8 hours long making these jumbo candy canes to give as gifts and to use as decoration inside of your house like to hang into your door.
So tomorrow’s video, I’m going to show you how to make these. But the cost of making this is $2.66 because we got the majority of the supplies at Dollar Tree. So I’m so excited to share with you guys how to make them because they’re fun to make, they’re easy to make, and they’re super affordable.
How to Organize Ribbon
All right. So I explained all that. And then the last thing that I want to show you are my – where’s my ribbon? OK. So I think I showed this in another video but I – so every time I get a gift that has ribbon on it, I always save the ribbon because I feel bad throwing it away and I feel like it’s a waste and ribbon is expensive. So all the ribbon that I keep that has already been used, I put on these binder rings just like this. So I kind of just tie them on and then I just hang them. They’re in my closet upstairs and I’m going to show you guys but I just hang them on the rod just like this.
So when I’m looking for a ribbon for my jars or for my bags or to wrap on a gift, the first place I’m going to look is my used ribbon. I always try and use my used ribbon first before I use all the brand new ribbon. And nobody ever noticed because the stuff looks good as new when it’s used and it’s still pretty and it’s a waste just to throw it away. So that’s the ribbon.
I think that’s everything that I want to share with you guys. So like I said, setting up a holiday gift station takes like 20 to 30 minutes maximum time and it kind of – it’s nice because everything is together in one spot. So when you’re wrapping gifts, all you have to do is just go to your station and you have everything ready to wrap right there.
And also, a lot of times you’re wrapping – like you’re not doing all your wrapping in one day. You’re kind of spreading it out. So you’re not having to like take everything out, clean it up, and do the same thing next week. Everything is just right here.
So I hope this video was helpful and I hope you guys are having a great holiday season. I will see you guys soon. Bye!

